Wednesday 28 August 2013

FFC15

Welcome to another Festive Friday, this time a theme challenge to create a project related to children. I'm having a little trouble thinking Christmas these days since the hot weather returned, but am making a valiant effort to stay on track and be ready before Christmas.  The first thing that came to mind for a children's theme was this snow globe set I bought at Michael's several years ago. It's one of my favourite Christmas sets, but I haven't used it for at least a couple of years, so it was fun to dust it off!
 
I stamped everything with sepia Versafine ink, and colored the image with SU watercolor wonder crayons and a blender pen, then cut all the pieces, including the white card base, with my PTI mat stack 3 dies. A button and linen thread finish it off.
 
Thanks for stopping by,
T

Friday 16 August 2013

Muse #30

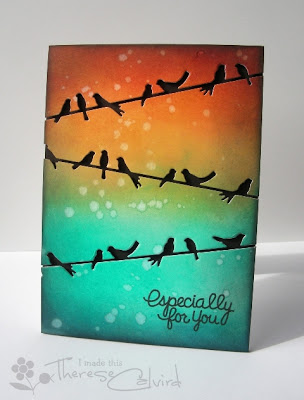
I was completely smitten with the gorgeous card created by Therese Calvird for the Muse challenge this week, so I couldn't resist playing along. I don't have the birds on a wire that she used, or anything of a similar style, but what I really loved about her card was the beautiful colors, and the contrast of the silhouetted image, so that's what I chose to focus on.

I tried embossing a silhouette in espresso and sponging on some color. The dimensions of this wheat image left a lot of open real estate that seemed to cry out for a little embellishment, so I decided to add water droplets like Therese did for texture, and a bit of raffia for a rustic touch.
Did you know that you can curl raffia like gift wrapping ribbon? I discovered it by accident several years ago. I must warn you that it's a little unpredictable, and takes a bit of patience to get just the right amount of curl and get it going in the direction you want it to go! Also, I recommend using the back of your scissors rather than the sharp side, and be gentle so it doesn't break off much shorter than you would like.
Some of the water droplets are a little larger than I would like, but all in all, I'm happy with the effect. I was a little reluctant to try it because I was really happy with the colors, and afraid I was going to make a mess of it and have to start all over again. I find it's often best to just dive right in and see what happens. The results are usually a pleasant surprise, and if not, there's lots more paper where that came from!

Before I sign off, I give you a peek at the project that inspired this post.

Isn't it amazing? Thanks for the inspiration, Therese!

Thanks for stopping by,
T

Supplies
SU: white and espresso cardstock, pool party/pear/daffodil/tangerine inks, espresso emboss powder
PTI: signature greetings II, ocean tides ink
Inkadinkado: meadow stamp set
Other: Versamark ink, raffia

Wednesday 14 August 2013

FFC14

Hi there,
Here I go again, getting in on the Festive Friday challenge at the last minute! Actually I'm pretty amazed that I'm posting 2 days in a row. That's a record for me during summer.

This time around, the theme is candy cane, but I was disappointed to miss out on snowflakes a few weeks ago because I really wanted to try out this new border die, so I merged the two together. I stuck with a simple red and white color scheme to compliment the candy cane greeting.
 The "merry" die cut is popped up with foam tape to make sure it's the star of the show
Thanks for stopping by,
T

Supplies
cardstock: white (PTI), white and poppy parade (SU)
dies: wonderful words (PTI), gabriella border (Memory Box), snowflake embossing folder (Cuttlebug)
stamps: wonderful word and super stripes (PTI)
ink: poppy parade (SU) and Versamark
embossing powder: detail white (Stampendous)

Tuesday 13 August 2013

MIM #129

Welcome to another Make it Monday challenge at PTI, featuring the tried but true crayon resist technique. I haven't done this in ages, and it was kind of fun to dust that idea off, and try it with new supplies.

I don't have many outline sets from PTI, and nothing seemed well suited to this technique aside from the same flower fusion set Heather used in her video. I wanted to change it up a bit, so dug through my stash and came up with this new pansy set from SU that fits the bill.
I started with stamping the pansies with sepia versafine ink on vanilla cardstock and coloring in with vanilla crayon. I sponged over the panel with my favourite ink, limeade ice from PTI. I love how it looks with an espresso mat over limeade ice cardstock. It just needed a few rhinestones to make the flowers pop, and a photo finish strip for the sentiment from the mat stack 5 set. I cut a couple of slits in the strip to feed through some bargain-bin brown, satin ribbon, and added a button and bow to finish it off.

Thanks for stopping by,
T

Thursday 8 August 2013

MIM#128

Welcome to the Make it Monday challenge at PTI!

I was out with some girlfriends for a birthday dinner Monday evening, and it went looooong! What can I say. When you only see people 4 times a year, it gets chatty when you do get together. Anyway, even though it was after 11:00pm, I had to make a card for my cousin's son Leif's birthday the following evening. No store bought cards for my family! A 7 year old may not really be able to appreciate it, but I know his Mom is the type who will save it for the day he's old enough to "get it". Too bad he's too young to appreciate his champagne birthday, 7 on the 7th. Luckily mine was 20 on the 20th!

I'm generally up 'til midnight anyway, so this wasn't really a hardship. I had already planned to use this new balloon set from my latest PTI order, and had also ordered the polka dot basics set on the same order, so was thrilled when I watched the Make It Monday video and realized the fun, random background Ashley created would compliment a bunch of party balloons perfectly. When you're on a deadline, it's good to have a plan before you start! It was just a matter of choosing the right color combo for a boy card. The only time consuming part was tying the twine onto the balloons. I guess I could have just taped them to the back, but it's the little details that bring it to life, so it was worth it in the end.

This actually came together pretty quickly, and I'm loving it, so I'll likely be revisiting this idea next time I need a quick birthday card. It's easy to personalize this card with the right color scheme and number, or maybe a "Happy Birthday" banner for an adult rather than the number?

Thanks for stopping by,
T

Supplies
PTI: white cardstock, simply chartreuse ink, birthday style set and die, polka dot basics set
SU: poppy parade, peach parfait, and bashful blue inks, bashful blue scrap
Other: green baker's twine, Scotch foam tape