Sunday 16 February 2014

Muse #54

Hi there,
I'm watching the Olympics again today, and playing along with the Muse challenge while I'm at it. I loved the card by Therese Calvird, so I couldn't resist diving in.

Isn't it lovely? My favourite elements were the texture of the background, and the unexpected way that flower bud spills over onto the background, so I made a point of incorporating those things in my project.
I pulled out the sanding block, and some textured pool party Core'dinations card stock, and sanded it down for a bit of a shabby, aged look that really reminds me a favourite, old pair of blue jeans. I'm totally using this background again soon! I hope you can see the texture in this photo.
 
 I stamped this Stampendous Daisy Cluster image on a piece of rustic ivory card stock in sepia Versafine ink, then painted it with a variety of blue, green and yellow inks and an aqua painter. Man, I loooove this stamp. No idea why I've only used it once before? So fun to use it again in a different way by stamping only part of the image on a too small strip. I also stamped the top 2 flowers directly onto the pool party base and colored them in, then trimmed the ivory panel down a bit, and added a sentiment in sepia.
The butterfly looked a little sad, so I added a little white, dazzling diamonds glitter to give her a subtle lift.

Thanks for stopping by,
T


Thursday 13 February 2014

Building Blocks Challenge

Hi there,
It's Day 9 of PTI's 7th Anniversary festivities over on Nichole's blog. Today's challenge was to roll the die and select 9 elements to include on your project. I ended up having to work with a dark chocolate, spring rain, hibiscus burst, and classic kraft color scheme, plus heat embossing, adhesive pearls and bakers' twine on a birthday card with the layout you see here. A tall order!
 
I pulled out my mixed pack of perfect match card stock to see how I could pull those four colors together, opting to use the chocolate and kraft as the background, and blue and pink as accent colors. Luckily I happened to have espresso embossing powder and bakers' twine from PTI, and some pastel colored advesive pearls from Michael's that included blue, so I had all of the elements I needed aside from the tipped tops dies. I had to eyeball that and manually cut the angles in the chocolate piece with my paper trimmer. Simple enough. The only other things I needed to turn this into a finished project were my pouch of kraft buttons, and a variety of punches to make some flowers. This actually came together pretty quickly, and is cuter than I thought it may be.
 
That's all for today.
Thanks for stopping by,
T

One Layer Love You

Hi,
I haven't made a one layer card for awhile, so I decided to give it a whirl today. It's not really my forte, but I like to flex my creative muscle now and then, and step out of my comfort zone!

  Less is More is doing a one layer challenge this week, One Layer Week 158.  The theme is anything goes, so I wasn't sure where I wanted to start. So many possibilities. I had a look at Heather Telford's card at the One Layer Simplicity Challenge #2: Can you Repeat that?, and drew a little inspiration from there. She used greens and blues (a favourite combination for me), and a repeated stamped image, in her case, a dragonfly.
Heather is the queen of sponging, and I often lean towards masking and sponging to add dimension and texture to a one layer card, but opted to keep it pretty simple today. (Actually this seems a little too simple to me! I still want to add more to it, but I can't decide exactly what it needs, without adding a layer to it, so I guess I'll leave it as is. For now).

Thanks for stopping by,
T

Supplies
Inks: limeade ice and ocean tides (PTI), pool party (SU)
Sets: printed petals (SU), script sentiments and side by side sentiments (PTI)
Other: Recollections rhinestones and YG23 Copic marker

Wednesday 12 February 2014

FFC24

Hi, my name is Tanis, and I'm an Olympiholic. I'm trying to tear my eyes away from Olympic coverage long enough to write a last minute post for the Festive Friday challenge! It's a challenge alright.
 
I meant to start on this challenge on the very first day. I loooooove this inspiration photo. The first thing that caught my eye was the colors, and the white pinecones, which I wanted to use as a focal point.
I embossed some pinecones in pearl white and the branch in detail gold on vellum and fussy cut them.

I used fine linen cardstock from PTI for the card base, and stampers select white for the top layer. I cut a window with a Nestie die, and embossed the greeting in gold, then added a bit of gold ribbon, and popped up the top panel with foam tape.
Now back to my Olympic highlights. Go team Canada!
Thanks for stopping by,
T

Monday 10 February 2014

PTI Anniversary Recipe Cards

Another day, another Papertrey Ink project! This challenge dates back to Day 1 of PTI's February release. Finally getting around to playing with these downloads. Nichole posted some "inspiration recipe cards" with a number of fantastic color combos, and sketches to go along with them.
 
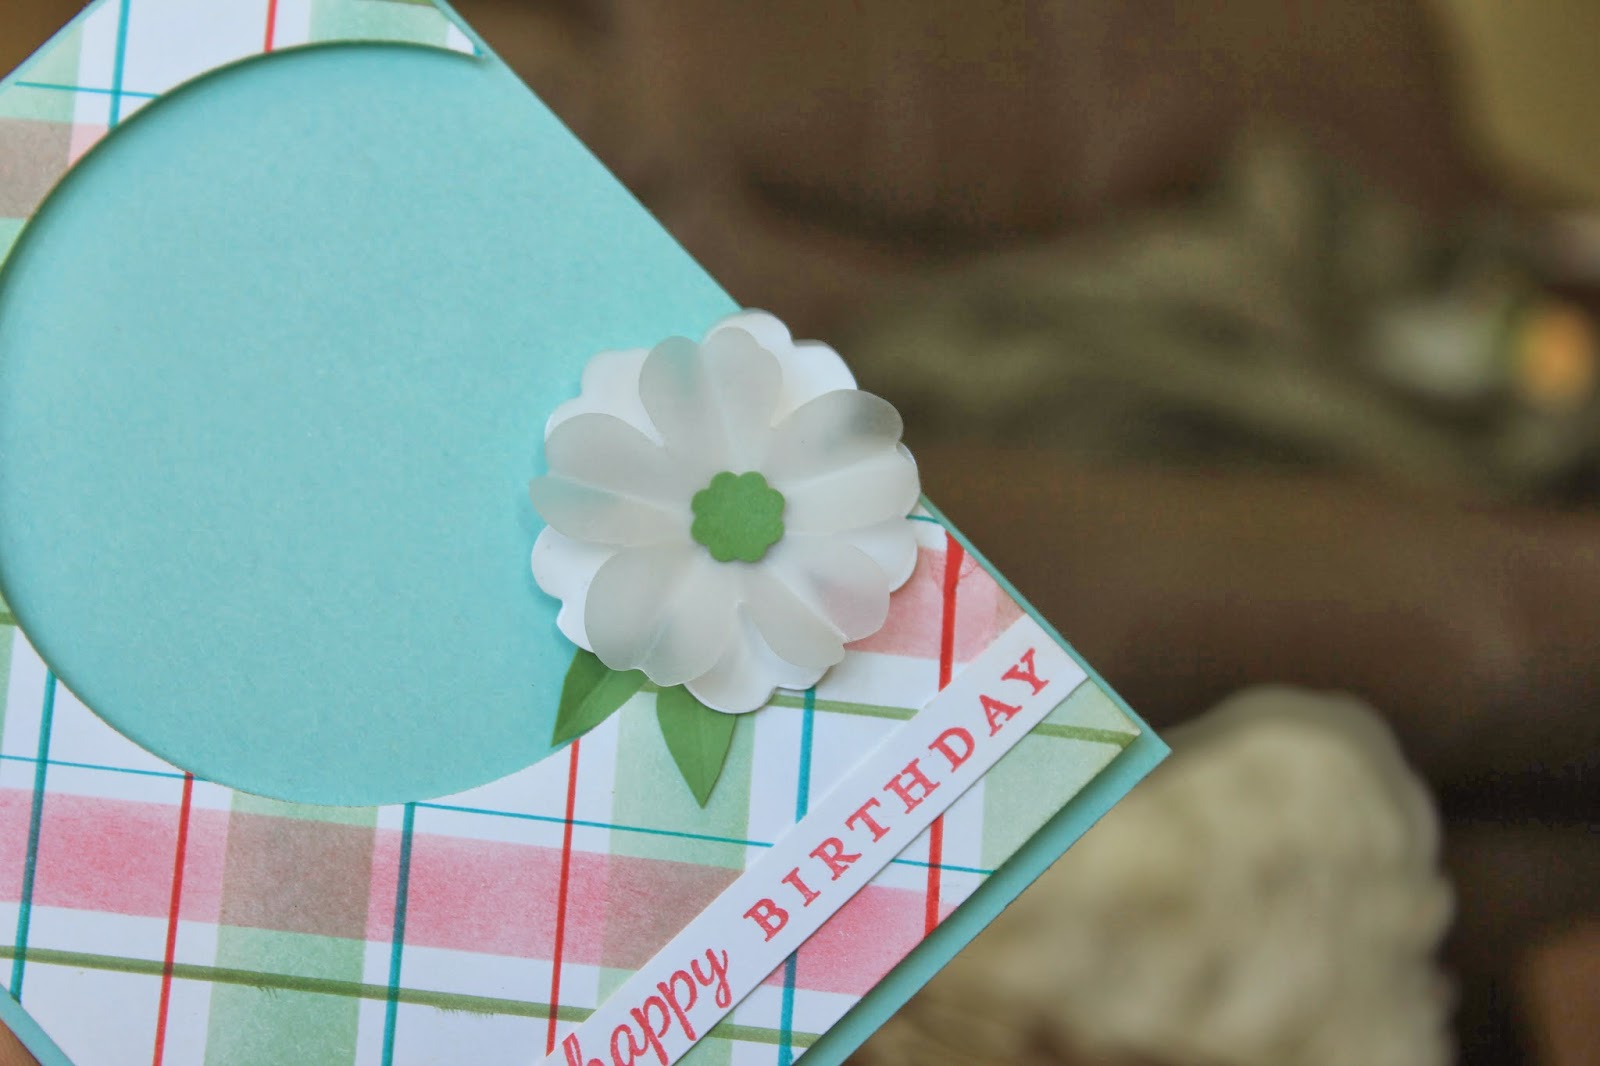
I was feeling inspired to make a plaid background, so I opted to use this color recipe which seemed like it would work well:
Color-2
I decided to choose this sketch because I thought it would be fun to mix the circular element with diamond shapes in the plaid:
Sketch-2
I also thought it would be fun to "flip" the sketch by making the circular element a "negative space" by die cutting out a piece of the plaid panel, allowing the aqua mist card base to peek through.

I used a variety of ink pads and markers to make the plaid, trying to get as close as I could to the colors from the recipe card. I do have the Super Stripes set which works great for making plaids, but I opted for a softer look this time by using painters' tape and sponging.

I stamped "happy" from Wonderful Words: Birthday, and "birthday" from Everyday Happiness in the pink on a scrap strip of white.
I used my SU pansy punch to cut a base from white cardstock, and 2 more layers from vellum scraps, scoring the vellum pieces and folding them a bit to add some dimension. A small scalloped circle and hand cut leaves from green finish it off.

Thanks for stopping by,
T

Sunday 9 February 2014

PTI Birthday 2

Hmmmm, it's seems that the link up will not let me add a second pic from the same post, so I'm posting again! Scroll down if you want to see today's post with a few details and better pics of this birthday card.
T

PTI Birthday

Welcome to another day of Papertrey Ink's 7th birthday celebration. So much for my plan to only blog 2 or 3 times a week! Who can resist the opportunity to win free PTI products? Not me, which is why I'm letting my husband take a pick of me with this birthday card for a second chance to win.
He's not the best photographer, but it's probably marginally better than selfie.
I used my current fave PTI set, Meadow Greens. I stamped the greenery in Simply Chartreuse, and stamped the blooms twice with SU's Elegant Eggplant. The second time, the color happened to turn out exactly like Winter Wisteria, so I die cut the Happy One Liner with Wisteria card stock and trimmed it down because I just wanted the word. I also managed to use one previously unused item by adding "birthday" in eggplant from my new Everyday Happiness set.
I punched a border in Wisteria, then added a strip of scor tape and some glitter. It's difficult to see, but I also added some glitter to the darker flower with a 2-way glue pen.
 
That's all for today. Make sure you check out all the goodness on Nichole's blog today!
 
Thanks for stopping by,
T

Saturday 8 February 2014

Timer Challenge

Hi, it's Day 3 of the 7th Anniversary festivities at Papertrey Ink, Today brings a different type of challenge to make a project using 7 items collected in 7 minutes, and complete your project within 17 minutes. I didn't time myself collecting my supplies, but it didn't take long. I already had most of the stuff I needed in the living room, so I just had to run to my craft room and grab simply chartreuse and elegant eggplant (SU) ink pads. I need to work in front of the tv so I can watch the Olympics! Canada is in good position to medal in snowboard slopestyle, so I don't want to miss the first medal!

It took about 15 minutes to do this card while watching tv. I'm not 100% happy with it, but I used 7 stamp supplies, and I couldn't think of a way to step it up a notch without adding an eighth. It looks better in person, but I wish it had a bit of sparkle. And I wish this lighting didn't make the purple look almost black!

Here's my list of items: white and limeade ice cardstock, meadow greens and everyday happiness stamp sets, simply chartreuse and elegant eggplant ink, and happy one liner die.

Thanks for stopping by,
T

Thursday 6 February 2014

Printables 2014

Hi there, just a quick post tonight to join in on the 7th Anniversary festivities at Papertrey Ink. Unfortunately, because of the short deadline on this one, I have no chance for a pic under daylight conditions, so the flash will have to do!

When I saw Heather's printable image, I thought a true black card base would be the perfect way to add some drama to a very simple layout. Some red satin ribbon and rhinestones add a bit of sparkle.

Thanks for stopping by,
T

Saturday 1 February 2014

CC2

Welcome! I'm trying out a new challenge called The Card Concept. Unfortunately I missed the first challenge because I just got home from Cuba that week, and wasn't really back into the swing of things. You know, busy doing laundry, grocery shopping, and all that jazz. Anyway, this is their second challenge, adding texture to your card.

Now that didn't really sound like much of a challenge for me, since I rarely make a card without some added texture, often from an embossing folder or impression plate, so I decided to do something a bit different today, adding layers of heat embossing. I looooove heat embossing and use it frequently, but I don't think I've ever used 3 different powders on one project before, and definitely not layering one color over another. I was a bit worried that it may turn into a total disaster, but was actually pretty easy.

I first stamped a fern leaf directly onto my cardstock, then embossed the stem over top. Then I layered an embossed fern leaf over that. The tricky part came next. I embossed the blooms in white, then had to line up the radiating flower stems. It turned out pretty well just by brushing of a bit of the green powder here and there that wasn't perfectly positioned before heating it. It comes off of white embossing really cleanly.
I clear embossed the word birthday, then added a die cut Happy on top to finish it off.
 
My style sometimes leans towards clean and simple, and sometimes it's more classy and elegant, but most often it's clean and layered, and I think that's exactly where this card falls.
 
Thanks for stopping by,
T
 
Supplies
Cardstock: pool party, white (SU)
Stamps: meadow greens, wonderful words additions (PTI)
Dies: one liners: happy (PTI)
Ink: limeade ice (PTI), Versamark
Embossing powder: detail white, clear (Stampendous), leaf (Zing)


Muse #52/ MIM#150

Hi there,
If you've seen either of my previous posts this week, you'll know that I'm on a bit of a vellum kick, using up leftover pieces from my scrap folder. Well, I've taken it to a whole other level today, cutting 5 elements from vellum! I made a card that I think I may use for Valentine's Day, though it is certainly not in traditional Valentine's colors. The layout for my project was inspired by this week's Muse challenge, while the idea to make the focal point a framed window with a die cut "screen" behind it came from Melissa Phillips on PTI's current Make it Monday challenge. I wasn't sure when I started that I would actually incorporate all of these elements onto one card, but it worked out thanks to the subtlety of the vellum parts.

Here's the beautiful card created by Marion Vagg that kicked off this design.

I especially loved the monochromatic border at the bottom of Marion's card, which is what got me thinking about using vellum to die cut a border. I also love the pop of color from the flower and really wanted to capture that in my project, but I opted to use a butterfly instead, which seems a tad less feminine, especially when done in a blue and green color scheme.
This is the example posted by Melissa for Make It Monday of the window screen technique.
17
Her screen has a much bolder texture than mine, partly because the white on blue really makes it stand out. Here's a closer look at the texture of my window screen.
I opted to attach my card front to a glossy white card base to contrast with the matte texture of the vellum so it wouldn't blend in too much.

Hopefully my hubby will love this card. My dirty little secret is that I like to give him the cards I'm not ready to part with so they can continue to live at our house! We'll see if I end up coming up with another idea before the 14th? If so, I could still give him this one for our anniversary in March.

Thanks for stopping by,
T

Supplies
Cardstock: limeade ice (PTI), smoky slate and bermuda bay (SU), glossy white (freebies from my neighbour), vellum (Recollections)
Stamps: turning a new leaf, script sentiments (PTI)
Ink: smoky slate, bermuda bay (SU)
Dies: layerz and mat stack 3, heart and xoxo border dies (PTI), piestra tile (memory box)
Punches: elegant and bitty butterflies (SU)
Other: rhinestones (SU)